Monday, July 30, 2007

Cards and gifts

When I first started blogging I never imagined that I would make such good friends that I have-and such generous ones as well.
One such person is Joanna who lives in New York.
To think that I would become friends with Joanna who is younger than my daughter is truly amazing but I have and I am so pleased that she has come into my life even if it is via the internet.
Joanna and I are participating in a card swap each month and it is great to see how we can come up with different ideas each time.
Well today I received my parcel from Joanna with her cards and an abundance of gifts as well.
The first is a tag that I admired on her blog several weeks ago -she does these amazing paper tole designs and these fairies are so small it is incredible.


Next is a card that has fabric flowers on it done in the same technique as she does her paper tole i.e.parts of the flowers are layered on top of each other-so beautiful.


This card has a background using the shaving cream technique and has a stamped fairy which has been coloured in with watercolours-I think.


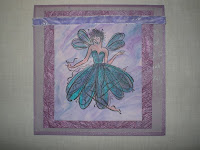
and the third one also has a fairy on a background which I think is either fabric or suede paper again very beautiful.


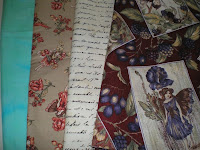
Also in the package were these fabrics -L/R they are a hand dyed fabric -fairy fabric-fabric with writing on it that I won and another piece with fairies on it about the size of ATC's.


And then there was this sheet of Acetate fairies-


And some embellishments-


A gift for Ebony-


And lastly for me a lovely pair of pink fluffy socks that match my pyjamas and are soooo warm and comfy just right for our cold Canberra winters.
Joanna what can I say except you are the most generous person I have ever had the pleasure to have known.
Thank You --thank you--thank you.


Sunday, July 29, 2007

Copper Wire Bookmarks with Beads

I have been busy this week but unfortunately I can't show you at present- but keep watching this space later on .
Today I made some bookmarks using 2.03mm copper wire which is thick .
I cut it into 30cm lengths and coiled both the ends in opposite directions using a Wigjig.
I then made the tassel piece from beads- jump rings - eye and head pins.
Here are three of them- I may add some fibres as well --maybe or maybe not.


The finished length of the copper part is 14cm from coil to coil and the bead tassel is 10cm long.
These were for a special order for a friend as she had purchased some from me last year and needed some more.

Tuesday, July 24, 2007

Postcards I sent


Recently I participated in a postcard swap with Lynda and Maureen and I can show you now the ones that I sent to them as they have both received them now.
The first 2 went to Lynda-the pink and purple one on the right is a hand felted nuno felt piece that I have stitched with gold thread and the one on the left is a piece of my hand dyed silk that I ran through the embellisher(an experiment) which gave it such amazing texture-I then did some hand stitchin on it.
If you click on the link below you can take a peek at the ones I received from Lynda.Sorry about the big link but that is the only way I could figure out how to post it - but it will take you there
https://blogger.googleusercontent.com/img/b/R29vZ2xl/AVvXsEhVZwmEniQr2afDh7ltGFi9SfVISXP9jKQrMQHUD3QKhZmGwYN-vzObCteFL0xMG88Kk2630ZNgfiz6S2Kj2q3X72tffZuz00HBpobV9GMXmvEY4OvvYmEw5RVxMwVTxejeAermupEmc1I/s1600-h/Postcards+from+Lynda.JPG

This is the card that I sent to Maureen-I did this on the embellisher and then stitched it on the sewing machine.
I hope both ladies are happy with them.

Monday, July 23, 2007

TAST Week 29 Arrowhead Stitch

Week 29 saw us doing Arrowhead stitch which I really enjoyed doing.
This was a very easy stitch-another one that I had not done before but I think it will be a useful stitch in the future.
The orange thread is a Perle 8 cotton and the green thread is silk and the fabric is an evenweave cotton. Once again I have just made it before Tuesday because I am trying hard to keep up each weeks so I won't get behind again.

Saturday, July 21, 2007

The Artists Muse--Chapter 4

This months Artists Muse challenge was to create a background piece of fabric -
The main instructions were to choose up to 12 different fabrics- cut them into 12" squares--which were then cut into several different sized pieces.
We then had to put the pieces into a paper bag and shake them up- take 1 piece at a time out of the bag and place it onto a base fabric that had vliesofix ironed onto it.
Once we had placed the piece of fabric onto the base fabric we were not allowed to move it.
When I had all the pieces on the fabric (some were overlapped) I covered the whole piece with a layer of fine black tulle and stitched it down with a wavy line in gold thread.

These are the fabrics that I used --mainly silks- satins and sheers.

The size of the finished piece is 30cm x 45cm and I made it this size for a reason
At the Machine Embroidery group that I belong to at the Embroiderers Guild we also had a challenge this month which was to create a piece of fabric that was A3 size.
So I decided that the one piece of fabric would be suitable for both projects.
Tomorrow (Sunday) we will all take our piece of fabric to the meeting and it will be cut up into strips (depending on how many of the ladies are participating-probably 6 - 8) and each person will get a piece of all the other fabrics.
The idea then is to take all the strips and make something out of them (other fabrics can be added to help in the construction of whatever you make.)
No colour theme was chosen so it will be interesting to see what colours others have done.
I will show you my fabrics that I get and what I have done with them when I have finished.

Thursday, July 19, 2007

The Last Train to Nowhere

It is school holiday time in the ACT and we decided (being good grandparents that we are) -that we would take Ebony on a Steam Train ride to Bungendore(a small village about 50ks away from Canberra.
We were all excited about the trip especially Stephen as he is a train buff and we both remembered travelling on steam trains when we were kids.
For Ebony this was a great experience.
There were approximately 250 people on the train 80% were kids naturally.
Here is a photo of the train( which belongs to the Australian Railway Historical Society) ready to head off.


And here's Ebony and Stephen standing in front of the engine amid a puff of steam.


The inside of the carriage was just like it used to be when it was in service-- here's Ebony and I all rugged up to keep warm--no heating in these old trains.


And then we set off on our journey.
We went through several tunnels and over a bridge and past beautiful countryside and the excitement was running high.
We were supposed to go into a siding to allow the Express train from Sydney past and then we would set off again to our destination---ETA was 12 midday.
The plan was to have just over 2 hours in Bungendore and then board the train by 2.20pm ready for our return journey.
WEELLL guess what --the train broke down about 30 klms out of Bungendore---minor problems we were told --take about 15 minutes-----yeahh --like 2 and a half hours later a deisel engine arrive from Canberra to tow us back home.
Now I ask you -how do you keep about 200 kids entertained in a confined area --all hungry and bored and cold.
We were not allowed off the train-and the conductors kept coming along and apologising and giving us updates.
Lucky for us I had packed sandwiches and drinks and lollies but the people who hadn't must have spent a small fortune at the cafeteria.
Here's Ebony and Stephen before we left Canberra.
A picture of boredom ---Stephen pulled his Beanie down over his eyes and pretended he was somewhere else.


Finally the Deisel arrived and we were soon heading back home at the precise time we were supposed to be boarding the train at Bungendore.
Ebony thought the hole thing was great and on the way home kept wanting to stick her head out the window -while I nearly froze to death because the window was open.


And here we are back at the station-Ebony had a great day --and the train to Nowhere was somewhere again.
We must have looked a sight with this old steam engine and 7 carriages being towed along by a deisel engine --Deisel engine one end and steam engine the other.

They told us we could get 50% off the fares if we wanted to book again next holidays(I don't think so) or we could get a 50% refund (yes please)
But in the end Ebony really did enjoy it and we did also up to a point (the point where the train broke down)

Monday, July 16, 2007

TAST Week 28 Sheaf Stitch

The stitch for this week is Sheaf Stitch ---
This is another stitch that I hadn't done before -but I had heard of it.
Sheaf stitch is an easy stitch to do and it seems to flow along very easilyand I think it would lend itself to a variety of designs.
I haven't been very creative this week with the sample I just let the needle and thread do all the work and this is what I ended up with.
I may come back later and do another more interesting sample but for now this will have to do.
I have used an even weave linen and several different variegated Valdani Perle 8 threads.

Sunday, July 15, 2007

More Cards

Yesterday I spent a great afternoon at my favourite craft/card store learning about using Alcohol Inks for making backgrounds on cards.
This is a great technique and really gives a card pizzaz.
It is amazing how it works--you have this wooden applicator that you put a felt square on to and you drop different coloured inks onto the felt plus a fluid that helps them to spread (I forget what it's called) you then pounce the block over your glossy card and end up with a beautiful mottled background which you can then stamp over.
I used a Stazon ink pad to stamp with -which is designed for shiny surfaces.
The first 2 cards were done in this style.
On the third card we used the technique on acetate --the inks were placed on one side and then it was flipped over and stamped on the other-it was then mounted on a piece of white card stock.


The last card has a distressed ink background and the little film strips were also coloured in with distress inks-this was a great technique.


and another challenge

One of the things that they do at the store is run a monthly challenge.
The idea is that you purchase a kit for a small cost and you have to make a card from it.
You don't have to use everything in the kit but you must use some of each item in the kit.
As you can see from the first photo--there is a piece of Apricot coloured card stock 6" X 12"- a piece of green card stock 6" X 6"- 2 pieces of double sided paper 6"x6"-2 different pieces of ribbon- 5 tiny paper flowers- 2 apricot brads -4 tiny glass stars -1 chip board tag -a gold metal ring clip and a small roll of very thin black tape.
I didn't really like the colours -I thought the papers were to pink for the card stock--so I altered the colour with a Vintage Photo distress inkpad.
This made the papers have an aged look and I was happier with them then.
I coloured the little flowers with the distress ink as well and then cut out little flowers from the floral paper with a flower punch and mounted them together with tiny brads the same colour as the big one.
I covered the tag with the striped paper and then distressed the egdes with an emery board.

This is the card when I had finished.

I'm happy with how it turned out in the end.

Friday, July 13, 2007

Cards I made

I spent a day recently making cards and when I had finished there was not one of them that had a stamped image on it.
Can anyone tell me why I have hundreds of dollars worth of stamps in my collection of "stuff."
At our last Paper Arts group one of the ladies brought along her new toy I think it's called a Cuttlebug -it is a die cutter and an embossing machine.
Well was I impressed -in one word yes- and luckily for me I had some card stock that I could use to test it out.
The paper used for no's 2-4 and 6 was a parchment paper left over from my daughters' wedding invitations 20 years ago (now I ask you is that what is called being a hoarder).
In the first one I rubbed gently over the top of the embossing with chalks.


The flowers in the second one are punched out from the card stock I used to make the card.


I think someone gave me the paper in the 3rd card -it looks like twin needled fabric.


The printed piece of paper in this one was something that I downloaded from the internet and tea dyed.


The background paper on this card is made from used tea bags and the little buckles are made with a punch -how cute are they?


And this is my favourite it is so soft and old worldy(is that a word) looking


Wednesday, July 11, 2007

Postcards and ATC's

I haven't posted for a week because I have been a bit unwell-but I'm better now and ready to go.
Today I received from Lynda 2 postcards and they are amazing.
They arrived naked and in perfect condition--I am truly amazed that they can travel half way around the world and arrive undamaged.
My photo does not do them justice as I kept taking a photo until I couldn't see the reflection from the flash but believe me the colours and the texture are unreal.
I have not finished my postcards for Lynda yet but I will put them up here when I do--sorry Lynda. These 2 ATC's arrived several weeks ago from Nadia from The Netherlands(who doesn't have a blog) and I forgot to post them but better late than never.
The one on the left is a Paper art and is titled "Moonlight" and the other one is fiber and is titled "Autumn Berries"
Thank you Nadia and I must apologise for not posting them here before this.
These are the two ATC's that I sent to Nadia.


Wednesday, July 4, 2007

TAST week 27 Bullion Knot

Bullion stitch- I have to admit is not my favourite stitch but in saying that I must admit that I managed to do my sample without too many hitches.
I have not ventured away from doing flowers as I wanted to get this over and done with- without to much pain.
I have used cream wool blanketing as my fabric and and Perle cotton for the Lavender flowers and the Rose and Perle Crown Rayon thread for the stems and leaves.
I used Broder Cotton thread for the yellow flower.


I should be able to approach the rest of the challenge without any problems because the two stitches that I like the least are finished .....and I am early getting this week's stitch done so now I am free to start playing again.

Sunday, July 1, 2007

Another Challenge

Recently I accepted a challenge from Anna Nowicki regarding some paper clip washers.
She had posted on her blog the message below and I have always been one to take on a challenge.
"Does anyone fancy a small challenge? Whilst training our office junior the other day I came across some paper fasterners with washers. The only problem is we have a largish box of just the washers. Rather than throw them out - being a recycling bunny I decided to bring them home. How can they be used in some form of textile art? If anyone wants to have a go at the small challenge... email me your snail mail address before June and I'll sent you 20 -30 of them. Then you can do something exciting with them and email me photos by the beginning of July and I will post them here on my -blog. If I can think of one I may even come up with a prize for the most inventive idea! So who wants to play"
I asked Anna for 40 discs as I had something in that I wanted to do with them--and trust me it wasn't what I came up with.
Sorry about the blue background on the photo because I had white paper behind it when I took the photo and every time I took a new photo the same thing happened.
I have taken a photo at each stage as I went along so you can see what I did.
The tassel head is copper mesh -for some reason the Tassel photo won't enlarge when you click on it but the rest do..


The discs were silver when I received them and I painted them with a spray copper paint.


I then used 24 guage copper wire...............


And added it to the discs.........................


I then got some brown beads..........................


And added them to the wire and discs and made these charms..........


Then I threaded the charms onto several strands of yarn.....................


And then stitched them onto brown ribbon for support- to form the skirt.
I varied the length of the loops that held the charms to give them an uneven skirt.


Here is a close up of the skirt--I hope Anna likes it.